How to schedule and send Power BI reports by email

Joel Monteiro
2018-05-30Power BI is an incredible Business Intelligence tool that combines powerful analytics with strong data visualization. Microsoft works incessantly on Power BI, adding new capabilities each month, and greatly improving the user experience.
Power BI comes in different versions, and the Pro version lets users share data and collaborate. However, while implementing it, we found out that, oftentimes, clients want to have a look at data regularly, leaving the collaboration part to data professionals. Since the current version doesn’t support an automated BI delivery system where users can schedule Power BI reports and automatically send them by email to just anyone, we developed a solution for this problem.
Introcucing PowerBI Robots!
PowerBI Robots is a Robots Process Automation (RPA) tool that lets users automate Power BI reports by scheduling them and having them delivered to anyone, anywhere. It’s the current the market-leading tool to automate and deliver Power BI reports and dashboards.
PowerBI Robots effectively lets users schedule a Power BI data refresh that’s then sent to the recipients of their choice. It’s mainly used by professionals who need to:
- send or receive regular updates on the most recent Power BI data, wherever they are.
- stream Power BI data on a large screen without a dedicated computer, such as a smart TV or a large video wall.
- share data from a Power BI account they manage with other users – even if those users are outside their organization.
- manage a business with different areas and have to recurrently send diverse Power BI metrics to different middle managers.
If you haven’t tried PowerBI Robots yet, click here to register for the trial version and download the desktop agent. This trial version gives you a full idea of what PowerBI Robots is capable of but isn’t recommended for extended use given its limitations: it only supports 5 playlists with up to 5 visuals each, and 5 recipients per playlist. In addition, your reports will have a red watermark.
Without further ado, let’s focus on the matter at hand:
How to send Power BI reports and dashboards by email
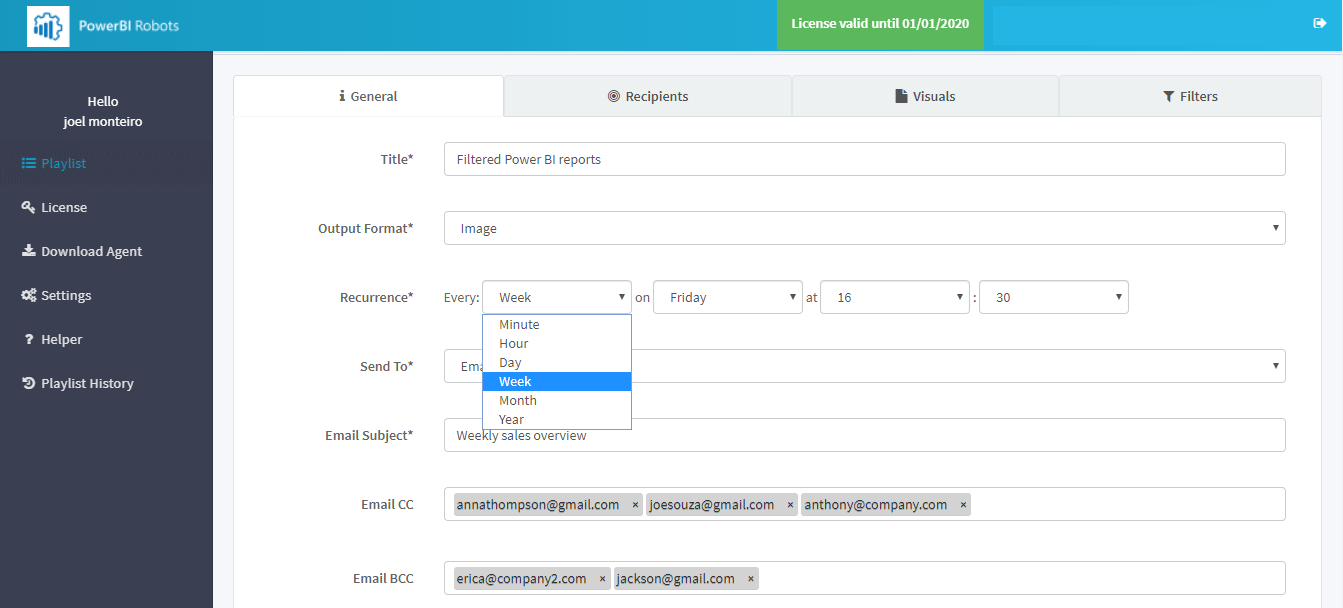
After installing and setting up the PowerBI Robots desktop agent, go to the web agent and click Create on the Playlist option in the menu. A playlist is a set of Power BI reports or dashboards, grouped to be sent somewhere, in our case, by email.
Then, on the General tab, you should:
- name the playlist.
- choose the screenshot output format (image, or single or multiple PDF files).
- set the screen size.
- set the screen-captures recurrence (i.e. your data’s refresh rate).
- select Email on the Send to.

Customizing your email's message
When it comes to the email’s message, PowerBI Robots allows for a lot of customization. In fact, almost as much as sending it from a dedicated email client. In the top menu, you have the most commonly used options at your disposal to make your emails feel unique.

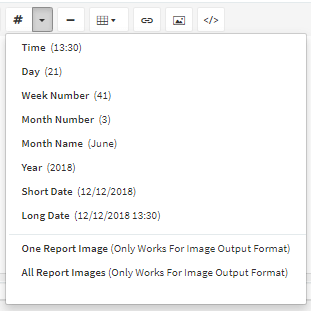
The Token feature comes in handy if you need to send emails frequently and to a large number of people. To use it, click the pound (#) sign from the menu. By selecting a token from the list, you’re ensuring these fields are always updated, making your emails feel fresh. Tokens are super elastic and versatile elements that greatly improve your messages and filters. If you wish to learn all about tokens in PowerBI Robots, we have a tutorial on the different ways you can use them to improve your Power BI report automation.

In addition, you can give the HTML editor a shot if you’re looking for even more customization. Click the XML icon on the menu (</>), and anything written in your email will get instantly converted to HTML:

Adding recipients and visuals to your playlist
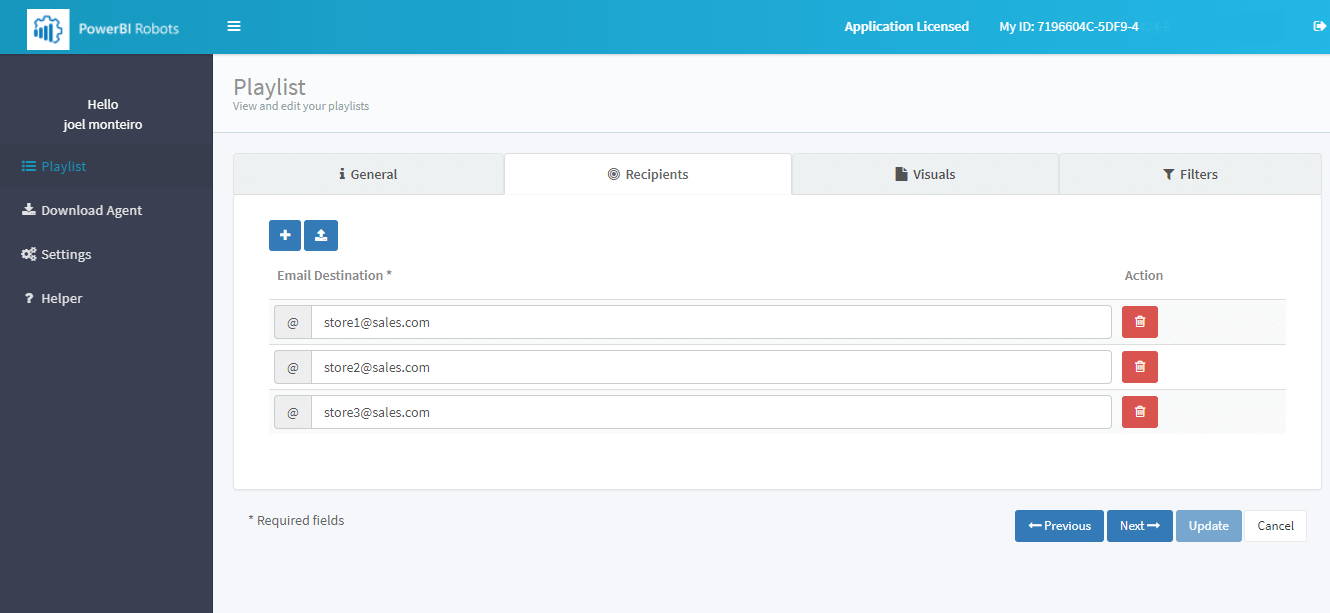
Afterward, proceed to the Recipients tab to add the email accounts you wish to send your Power BI reports to. Click the plus sign to add an individual email, or the next button to bulk import destinations. You can add as many data recipients as you wish.

Selecting the reports, dashboards, or visuals for your automated Power BI report playlist
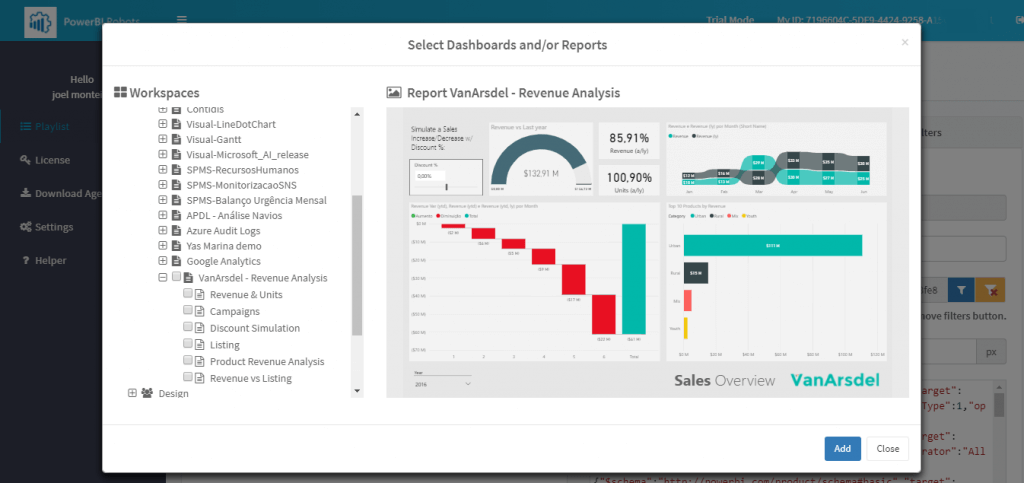
Once you’re done selecting your recipients, hit “next” and proceed to the Visuals tab. Click Add Power BI account to make a screen displaying your Power BI workspaces pop-up. You may see all reports, dashboards, and visuals contained on each by clicking the plus sign.

Next, you must select the report pages and individual tiles you wish to send by checking their boxes. Alternatively, select them all to send the whole report. Afterward, go to the last tab if you wish to apply individual filters to your reports. This is especially useful if you’re looking to send different data to different people from the same Power BI report. Finally, click Create to finish your playlist.

Lastly, open the PowerBI Robots desktop agent and hit Synchronize on the General tab.

Congratulations! Your newly created Power BI report playlist is ready and will be delivered to all your recipients by email!
As mentioned above, you can try PowerBI Robots for free by clicking here, registering, and downloading the desktop agent. When you’re ready to upgrade to the full version, a 1-year license is enough for company-wide use is available.
If you’re having any trouble installing and configuring the PowerBI Robots desktop agent, please see point 2 of our PowerBI Robots 101. If you still have any questions, please send us an email at support@devscope.net.

Sandro Pereira is back in London for Biztalk 360’s Integrate 2018
The primary conference for professionals working in the Microsoft Integration Space is back in London from June 4 to 6, and our MVP Sandro Pereira is one o[...]

